General
hadge: a comprehensive pipeline for donor deconvolution in single cell
A preprint is available here.
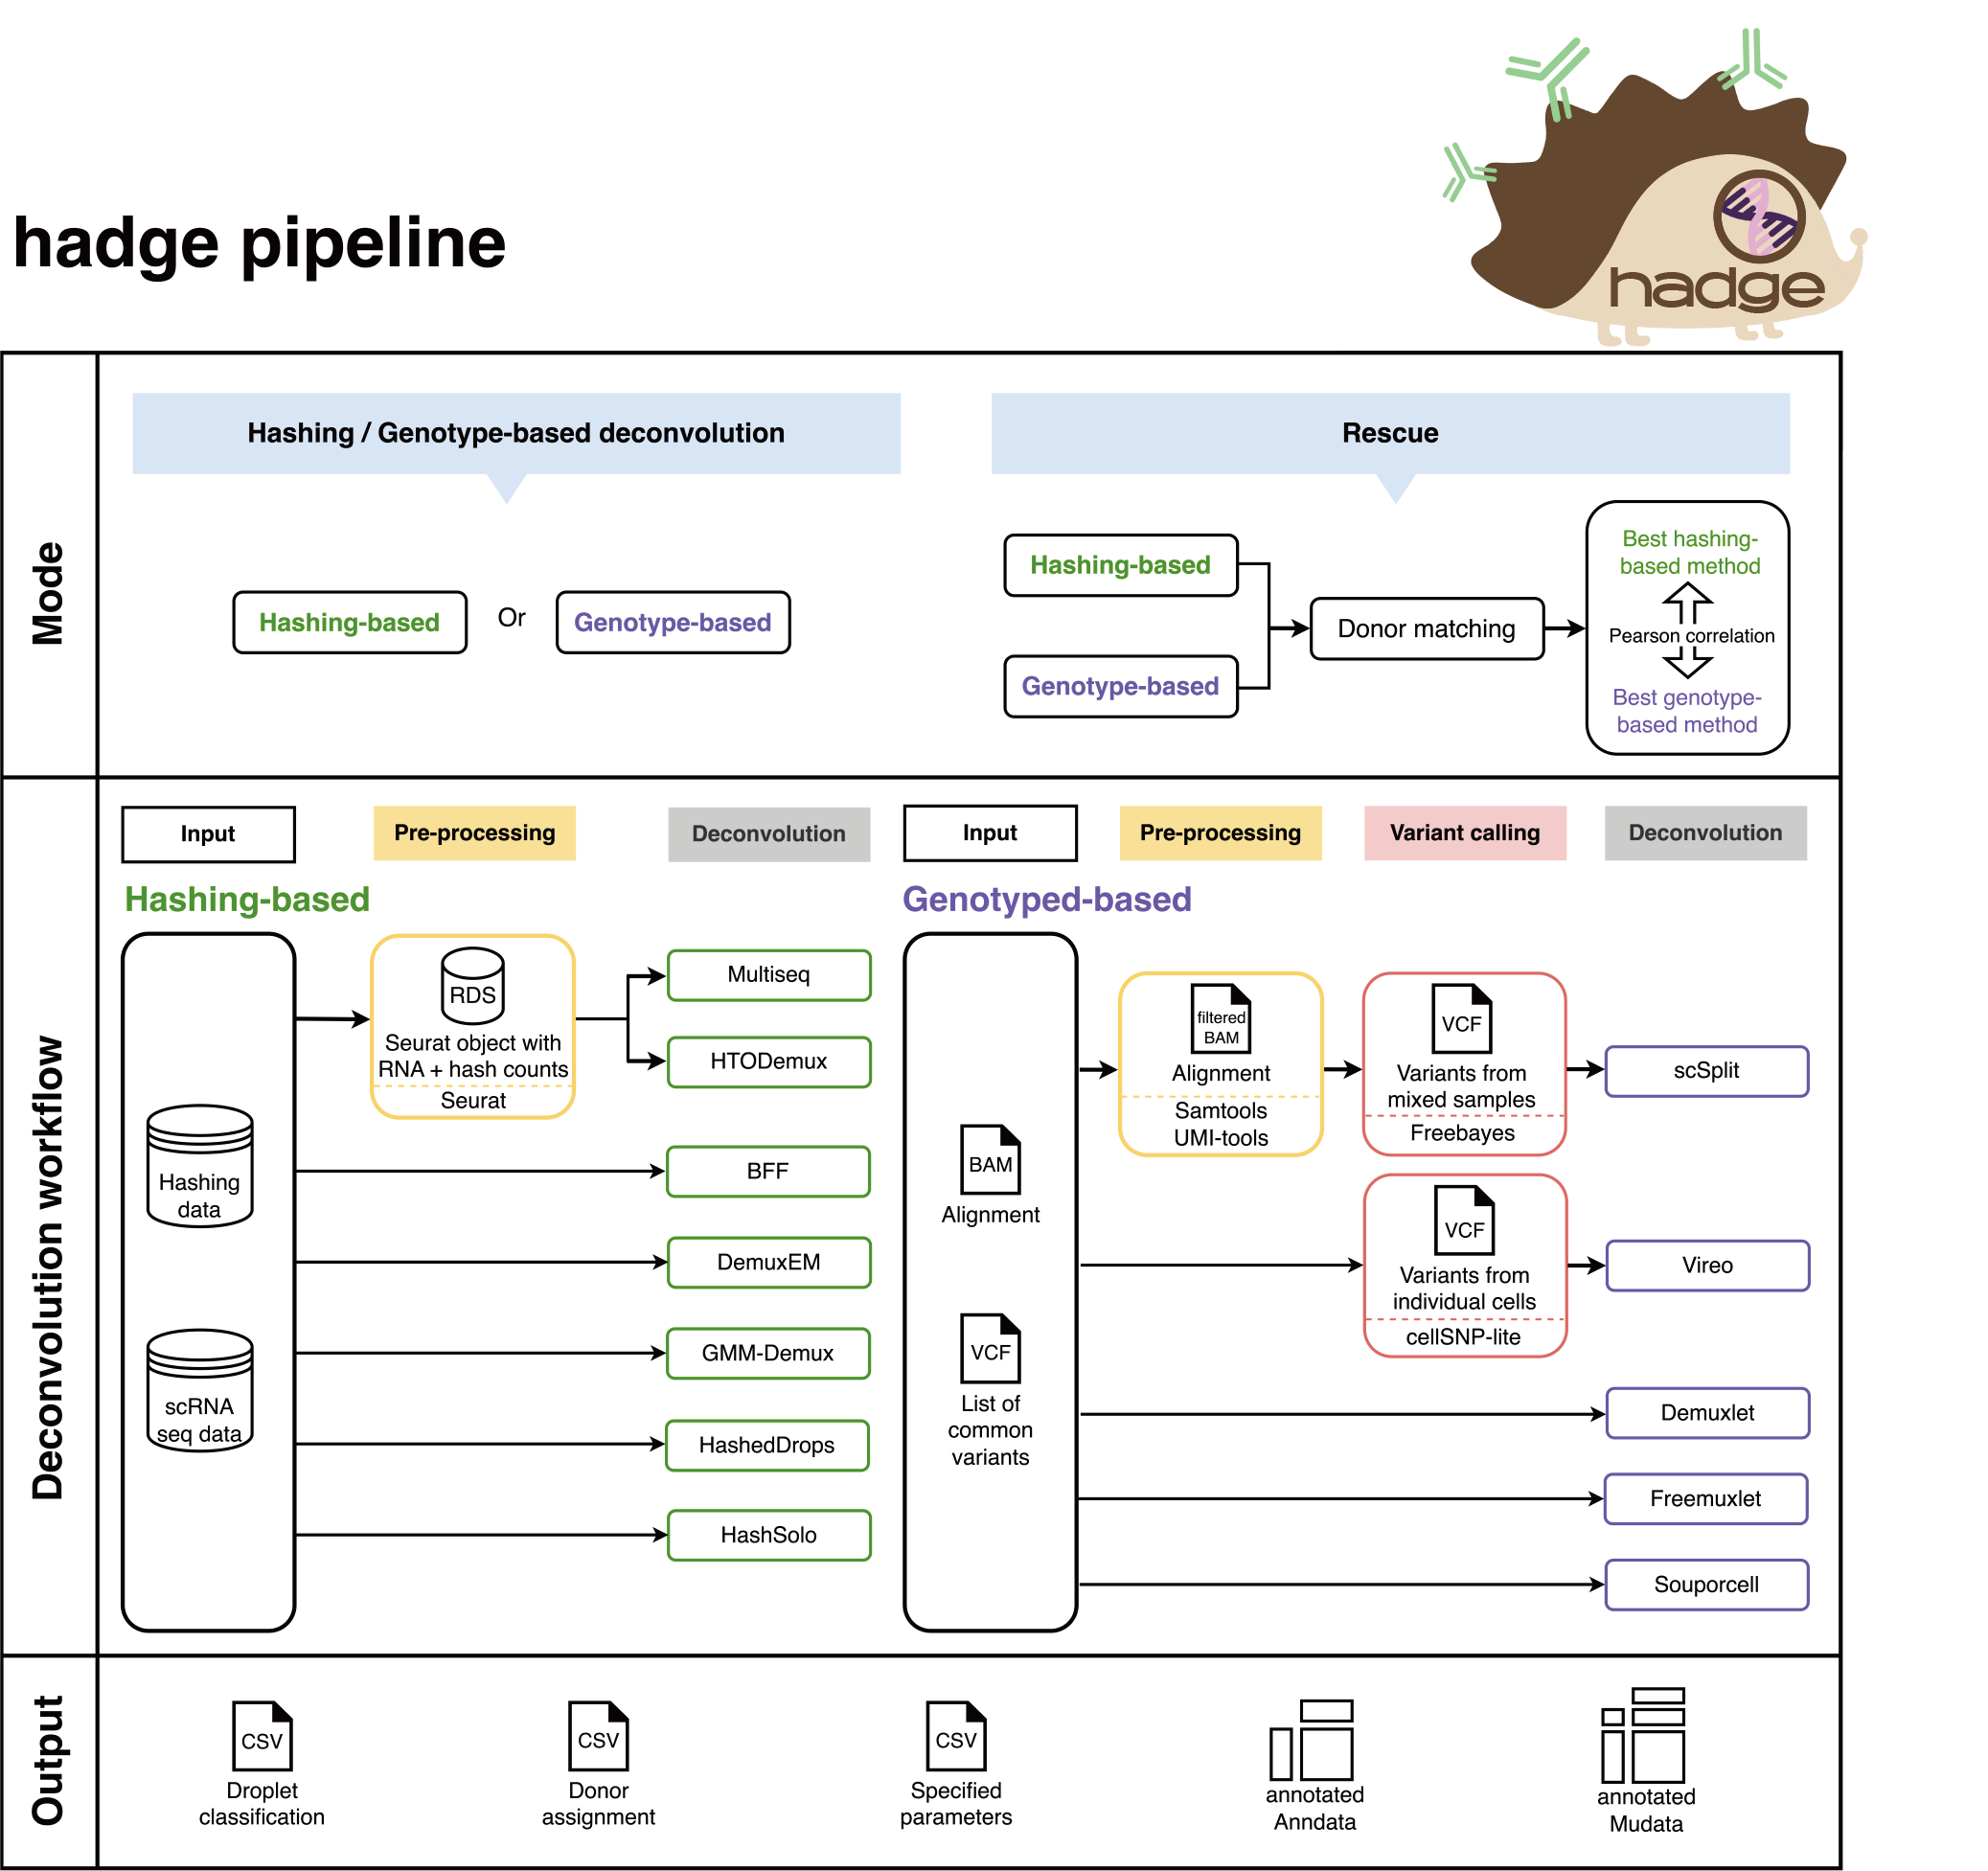
Pipeline overview:
The mode of the pipeline is set by params.mode. hadge provides 4 modes in total: genetic, hashing, rescue or donor_match.
genetic: Genetics-based deconvolution workflow (check Genetics-based deconvolution workflow)
hashing: Hashing-based deconvolution workflow (check Hashing-based deconvolution workflow)
rescue: genetic + hashing + donor matching (check Combining results: rescue mode)
donor_match: donor matching (check Combining results: rescue mode)
Pipeline configuration
The pipeline provides some pre-defined profiles for different use cases.
Test dataset
To get familiar with hadge, we provide the test profile for a quick start. To access the test sample data, you can use the provided bash script to download the test data to the project directory of hadge and run the pipeline locally.
sh ${hadge_project_dir}/hadge/test_data/download_data.sh
nextflow run ${hadge_project_dir}/hadge/main.nf -profile test,conda_singularity
Conda environments
By using the -profile conda option, the pipeline executes each process within a Conda environment specified in the conda directive.
Alternatively, you have the flexibility to add a new profile in the nextflow.config file, allowing you to use local Conda environments for running processes.
profiles{
    my_conda_profile {
        // dont forget to enable Conda
        conda.enable = true
        process {
            // Use Conda environment files
            withName:scSplit {
                conda = './conda/scsplit.yml'
            }
            // Use Conda package names
            withName:cellSNP {
                conda = 'bioconda::cellsnp-lite'
            }
            // Use existing Conda environments
            withName:summary {
                conda = '/path/to/an/existing/env/directory'
            }
        }
    }
}
Containers
Nextflow also supports a variety of container runtimes, e.g. Docker. To specify a different Docker image for each process:
profiles{
    my_docker_profile {
        // dont forget to enable Docker
        docker.enabled = true
        process {
            withName:foo {
                container = 'image_name_1'
            }
        }
    }
}
In general, it is recommended to run with -profile conda when you don’t need to run Souporcell. If Souporcell is necessary, please run the pipeline with -profile conda,singularity, where both Conda and Singularity are enabled.
Executor and resource specifications
The standard profile is used by default when no profile is specified, where the pipeline is run locally and all processes annotated with the
big_memlabel are assigned 4 cpus and 16 Gb of memory.The pipeline can also be run on an HPC. You can set the executor by running the pipeline with
-profile cluster.
profiles{
    standard {
        process {
            executor = 'local'
            withLabel: big_mem {
                cpus = 4
                memory = 16.GB
            }
            withLabel: small_mem {
                cpus = 2
                memory = 8.GB
            }
        }
    }
    cluster {
        process {
            executor = 'slurm'
             // queue = ...
            withLabel: big_mem {
                cpus = 32
                memory = 64.GB
            }
            withLabel: small_mem {
                cpus = 16
                memory = 32.GB
            }
        }
    }
}
Customized profiles
Configuration files can contain the definition of one or more profiles. Multiple configuration profiles can be specified by separating the profile names with a comma (no whitespace), for example:
nextflow run main.nf -profile standard,conda
scverse compatibility
To ensure scverse compatibility, the pipeline provides the option to generate AnnData or MuData objects after demultiplexing specified by params.generate_anndata and params.generate_mudata.
The objects contain the scRNA-seq counts from params.rna_matrix_filered and stores the assignment of each demultiplexing method in the assignment column of obs.
Additionally, if match_donor is True, the pipeline also produces an AnnData object which contains the assignment of the best-matched method pair after donor matching.
Pipeline output
The output directory of the pipeline is set by $params.outdir.
By default, the pipeline is run on a single sample. In this case, all pipeline output will be saved in the folder $projectDir/$params.outdir/$params.mode.
When running the pipeline on multiple samples, the pipeline output will be found in the folder "$projectDir/$params.outdir/$sampleId/$params.mode. To simplify this, we’ll refer to this folder as $pipeline_output_folder from now on.
The demultiplexing workflow saves its output in $pipeline_output_folder/[gene/hash]_demulti. The pipeline will also generate some TSV files to summarize the results in the folder [gene/hash]_summary under this directory.
[method]_classification.csv: classification of all trials for a given methodBarcode
multiseq_1
multiseq_2
…
barcode-1
singlet
singlet
…
barcode-2
doublet
negative
…
…
…
…
…
[method]_assignment.csv: assignment of all trials for a given methodBarcode
multiseq_1
multiseq_2
…
barcode-1
donor-1
donor-2
…
barcode-2
doublet
negative
…
…
…
…
…
[method]_params.csv: specified paramters of all trials for a given methodArgument
Value
seuratObejctPath
Path
quantile
0.7
…
…
[workflow]_classification_all.csv: classification of all trials across different methodsBarcode
multiseq_1
htodemux_1
…
…
…
…
…
[workflow]_assignment_all.csv: save the assignment of all trials across different methodsBarcode
multiseq_1
htodemux_1
…
…
…
…
…
adatafolder: stores Anndata object with filtered scRNA-seq read counts and assignment of each deconvolution method ifparams.generate_anndataisTrue. Details see section “scverse compatibility” above.mudatafolder: stores Mudata object with filtered scRNA-seq and HTO read counts and assignment of each deconvolution method ifparams.generate_mudataisTrue. Details see section “scverse compatibility” above.In the
rescuemode, the pipeline generates some additional output files, details please check Combining results: rescue mode.